Animals
 Animation
 Art of Playing Cards
 Drugs
Drugs Education
 Environment
 Flying
 History
 Humour
 Immigration
 Info/Tech
 Intellectual/Entertaining
 Lifestyles
 Men
Men Money/Politics/Law
 New Jersey
 Odds and Oddities
 Older & Under
 Photography
 Prisons
 Relationships
 Science
 Social/Cultural
 Terrorism
 Wellington
 Working
 Zero Return Investment
Robots and Space Warps
3D Studio Max Class Page 3Drop out of school before your mind rots from exposure to our mediocre educational system. - Frank Zappa Project 7: Inverse KinematicsOur assignment: To create a robot with a linked arm, to use the curve editor to ensure the links are correctly set, to set movement (sliding and rotational) limits for the joints, and to bind the robot's hand to a guide object so that, using applied kinematics, the arm automatically follows the object.
Cody's, mine, Wolf's - Click each to begin In class we learned when to use forward kinematics (an example is a person's arm swinging freely as he walks) and when to use inverse kinematics (goal-directed motion). We learned about the types of inverse kinematics solvers and when each type should be used.
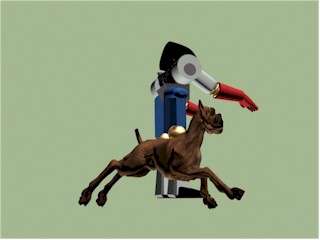
I had more trouble with this project than any so far. The basic project was easy enough (see "my initial project" below centre, which I did on the first day in case I was unable to get the animation clip I had in mind completed). I wanted to have a real robot, but I had a difficult time coming up with an idea. Since I had a dog mesh, I decided to try putting a bones system inside it, then automating it and have it bring the robot a ball to throw. I soon abandoned the idea of a thrown ball (I didn't want the dog to have to chase it!) and thought I'd have the robot put the ball out of reach; the frustrated dog would finally grab the robot's knee (a round ball joint) and run off. The robot's leg from the knee down would fall on the floor. So far so good. I didn't really know enough about Max at this point to realise how difficult this was going to be. The first week, I made the dog, including his skeleton, setting his degrees of freedom, and "skinning" him. I could reposition his limbs with no trouble (see below, left). "This is easy!" I thought. Ha ha. Silly me.
My fist attempt at skinning a dog, my initial project, my original animation cartoonised (right two are click to begin) The next week, I began to try to make the dog run across the floor. Frankly, this part I never finished - I ran out of time and his motion remains jerky and awkward. I think I could do a better job today, but I doubt if I'll bother for this particular project - because I could do a better job on the robot and the setting and everything else as well. There isn't a single part of this project I didn't have trouble with. But I learned more than I possibly could have if everything had gone right. I had something ready by classtime (miraculously) - only the project was too large to be shown in class (response time over the school's net was too slow), so the teacher showed the original project I had done. Later that day, I converted the .avi to ink and paint for a cartoon effect which made it much smaller (and smoothed out the dog's motion a bit) - but it was too late. Sigh. I must say that I thought Wolf's and Cody's were far and away the best projects turned in...
Project 8: Lettering and Space WarpsOur assignment: To use 3D Studio Max to create text, then extrude it. We were to use an environment map (a photograph) of a scene with a large body of water (lake or bay); we were to draw a sphere, then draw an S-shaped line which went around and over the sphere; apply a PathDeform modifier to the text so that it moved along the line; create a plane with noise that would become waves which reflected the sphere. For material for the sphere, we were to use shellac with raytrace whose environment map used a black-on-black checker material which excluded the plane from its reflection set. The shellac base material was to have a reflection map which was a colour-variant of the environment map. The plane material was to be matte/shadow with reflection and a raytrace map.
Click to begin: Cody's, mine, Wolf's In class we learned how to use various types of space warps, including free-form deformations, linear waves, displacements, waves, ripples, conforming objects and - bombs! (next week's project).
The basic project was quite easy. I used a space warp to create waves just like Cody did for his project (left above). Wolf, however, had used Reactor, 3D Max's physics program, to make his letter-path dip into the water, creating ripples (right above). I decided to try Reactor so that I could have a duck floating in the harbour. I soon discovered (with Wolf's generous help) that I couldn't use a space warp to make waves in water controlled by Reactor - and that Reactor made ripples, not waves. I didn't want ripples, because this was a harbour, not a lake. The solution ended up being to drop rocks one by one into the water at a spot far enough away that the ripples looked liked waves by the time they reached the duck. My biggest problem was that the reflection of the duck and sphere had disappeared from the water and nothing I could do seemed able to bring them back. Finally, I deleted the reflective plane and made a new one identical to it - and that, mysteriously, worked... Click here for:
Click here for:
Click here for:
If you're interested in having a any of the files, please contact me. We are using version 5 of 3D Studio Max (because that's what we use in class). We're all hoping that for next semester's advanced class we'll get to upgrade to the new Max 6 (this was in 2003, after all). (And we did...) Advanced 3D Studio Max projects
For more animation, video clips, and shockwave games click the "Up" button below to take you to the index page for this Animation section where you will find all sorts of
things. |